Instructions on How to Print the TIDE & TIDAL STREAM EVENT CALCULATOR detail below in your language:
1. Click on the box at the top of this page and select your language in the Google Dropdown box.
2. Copy and Paste the following 'TIDE & TIDAL STREAM EVENT CALCULATOR' pages to your favourite word processor e.g Pages for Mac, Word etc. Be sure to include the Figures (Figures 1 to 5) at the end of the instructions.
3. Print out the pages and/or save as a .pdf file which can be printed out later.
TIDE & TIDAL STREAM EVENT CALCULATOR
About the calculator
Ok so you’ve left your moorings and are about to embark on a nice sail down the local coast towards your evening destination port some thirty miles away. Everything is going well, nice weather, good sea conditions, everybody on board is happy. That is, until you approach that headland about half way through your passage. Let’s call it Start Point.
For those who know this headland, it is as well to check what time you are expecting to approach it.
Why?
Because Start Point (a headland in Devon, England (N50º 13.500′ W003º 37.555)), typical of many headlands on the UK coast, can have an uncomfortable tidal stream running; the direction depending on the state of the tide. At slack water and in good weather the headland can be passed close to shore with no difficulty, in fact a most enjoyable experience. At other times and in fair conditions, if the flow is in the same direction as you are going, it can be a comfortable boost. However, should you be sailing against the stream, not only can your boat be stopped by the stream speed, but you could find yourself going backwards - not really what you planned for! And that is in good conditions - in poor conditions and with spring tides this headland can be a very dangerous place, requiring a large detour to keep well off.
So going back to our story. During your approach to Start Point, the tide has turned foul and the wind may have picked up. Sea conditions have altered from flat calm to quite a swell. The sea area around the headland is looking rather rough and your boat speed is falling away. The best solution now is to start the engine and steer a course to give the headland a wide berth. Or indeed, you could take the chance and soldier on. You may well come to regret this decision as you battle against the stream on engine, and with your passengers and crew wishing that you, the skipper, had planned the passage better. Surely you could have calculated the period when the tidal stream turned against you? Couldn’t you?
Absolutely, and this is what our Tide & Tidal Stream Event Calculator endeavours to do.
Furthermore - It’s Free to download and use! And it is also unique!
By using the calculator, together with tide tables and the start and end times of the flow direction relative to High Water you will be able to calculate the times when the tidal stream is in your favour. This can then be assumed to be a ‘tidal gate’, to be included in your Passage Planning in order for you to adjust the start time of your passage accordingly and in good time to take advantage of that favourable stream. The start and end times of tidal streams can be found by looking at a Tidal Atlas for the relevant area. There are also other ways to find detail as shown below.
The TScalculate main sheet allows for up to 4 different Events to be calculated on the one sheet. If you are planning a fairly long passage or indeed expect to go through several “Tidal Gates” during your passage, TScalculate allows you to calculate several expected Events which can be printed out and attached to your Passage Plan for use in timing your passage. It is a very professional way of detailing your intentions and expectations.
You will most likely have a Tidal Atlas(s) for your local sailing area. However if not, they can be found in your Reeds Nautical Almanac if you are sailing in the the UK or parts of Europe. Alternatively they can be seen at the website “Visit My Harbour”, a link to which is to be found at https://www.visitmyharbour.com/articles/category/842/tidal-streams/. For other parts of the World there are similar Almanacs published with such information. Alternatively, and in addition, many of the sea area pilot books will have detailed information of cruising and sailing areas which will include advice on ingoing (flood) and outgoing (ebb) tide times for various areas and tidal gates, where is is important to have such knowledge.
An alternative way of finding such information is by searching the myriad sites online relating to sailing areas throughout the World, for specific pilotage instructions into and out of coastal areas in relation to tide High Water times at various Standard and local ports.
For instance, suppose we wanted to find the best time to start our pilotage from the Irish Sea to Portaferry, N.Ireland via the Strangford Narrows.
Using a simple search term such as “Pilotage into Strangford” or “Best time to enter Strangford Narrows from Irish Sea” will return a whole load of results giving advice on timings, including the Ebb and Flood tide start times related to High Water at Belfast or High Water Dover, the knowledge of which is essential for a safe passage through the Narrows. This information can be used in our calculator to tell you when these tidal streams start and end.
Such related search terms can be used for most sailing areas throughout the World and can be essential in informing you when it is favourable to make a passage in, particular, tidal areas.
Not only can TScalculator be used for events as described above, but it may also be used for other parts of our route where we wish to take advantage of favourable tidal streams such as entering/leaving ports and indeed being able to make our passage as comfortable and in as timely a manner as possible, particularly when our passage time exceeds more than one tidal period.
A description of the Tide & Tidal Stream Calculation Form and it’s forms and controls.
TsCalculator is made up of two main control sheets namely ‘TsCalculator’ and ‘MyPorts’. Additionally the application uses ‘UserFiles’ which is a sheet containing details of Ports which are input and saved by you, the user. It also uses a hidden data sheet which contains Standard Ports and other details which are non-editable.
‘MyPorts’ and TsCalculator’ are the only forms which you, the user can see and input details.
Description of ‘MyPorts’ form
This is a Console which allows the input of “Your Ports” i.e Ports of interest to you which are not on the standard list of UK and/or Europe Tidal Reference Ports.
The Console includes a list of the standard UK and Europe Tidal Reference Ports as taken from Reeds Almanac and these are the main ports referenced in the UK and Europe Tidal Atlas(s). This list is non-editable, and Ports can be selected to be sent to the ‘TsCalculator’ form for EVENT calculation. The same Tidal Reference Ports can also be selected on the ‘TsCalculator’ form for use in EVENT Calculation.
A button (top left hand) selects the ‘TsCalculator’ sheet.
The ‘Enter and Save Your Own Port’ allows you to save up to 52 additional Ports of interest to you. These port names are editable and can be selected and sent to and of the EVENT Port boxes on the ‘TsCalculator’ form. Or they can be deleted by clicking on the ‘Delete’ button. We have included the port of Torquay (South West coast of Devon, England) as a starter for you.
(Note: Refer to Figures at Appendix 1 at end of these instructions.)
1. Detailed function of MyPorts sheet - Figure 3.
This form will allow you to send Port details to the calculation part of the application and also allows the creation and/or deletion of your own Ports of reference.
Item 1 - Button - ‘Return to Tidal Stream Calcs.’ Clicking this will take you to EVENT1 of ‘TsCalculator’.
Item 2 - Select A Tidal Reference Port (Non Editable). Selecting the Yellow drop down list allows you to choose a Tidal Reference Port.
Items 3 - 6 - Clicking on any of the buttons 4 ‘Send Your Port to EVENT (1-4) will take you to ‘TsCalculator’ and will enter your selection into the relevant ‘Tidal Reference/Standard Port’ EVENT box.
Item 7 - Enter and Save Your Own Port. Click on the adjacent blue box and type in your own Port of interest. Provided that you have not reached the maximum storage of 50 personal Ports this will save your Port. If the storage is full, you will need to delete one of your saved Ports and then re-enter your new Port.
Item 13 - Clicking on the adjacent ‘Save’ button will save your Port ready for use later.
Item 8 - Select Your own Port (Editable). Selecting the Yellow drop down list allows you to choose one of your own saved Ports.
Item 14 - If you no longer require to keep the Port in your list you can delete it by clicking on the ‘Delete’ button to the right. If you wish to use your selected Port, then by Clicking on any of the
bottom 4 Command Buttons, ’Send Your Port to EVENT (1-4) will take you to ‘TsCalculator’ and will enter your selection into the relevant ‘Tidal Reference/Standard Port’ EVENT box. See Items 9 - 12.
Items 9 - 12 - Command Buttons - ‘Send Your Port to EVENT (1-4) Boxes. See above. Clicking on these buttons will send the contents of either of the filled Yellow boxes to the relevant ‘Tidal Reference/Standard Port’ EVENT box of the Calculation sheet.
By all means play with the MyPorts entries and see how they work. If you delete any of your Ports by accident, you can save them again by the ‘Enter and Save Your Own Port’ box.
2. Detailed function of ‘TsCalculator’ sheet - Figure 1.
This is the main form of the application and, following relevant input by the user, returns the start of 2 consecutive Event start times and end times of either a ‘Flood Tide’ or an ‘Ebb Tide’ relating to the ‘Tidal Reference/Standard Port’ or user defined Port and the relevant High Water times at that Reference Port on the day(s) input by the user.
The form is split into 4 panes EVENT 1, EVENT 2, EVENT 3 and EVENT 4. Each EVENT is separate from the other and allows the user to enter data and calculate four different events. They all act in a similar manner regarding user input and calculation.
NOTE: When the application opens, the initial Dates for EVENT 1 will default to Today’s Date (Item D). This will be repeated for the other 3 Events.
Looking at EVENT 1, the input boxes and buttons are described as follows:
Item A - Yellow dropdown box with description to the left “Event Calculation required at Tidal Area: (E.g Start of flood tide, start of Ebb tide)”. Clicking on this dropdown box allows yo to select either a Flood or Ebb tide event.
Item B - Yellow dropdown box with description to the left “Tidal Reference/Standard Port”. Clicking on this dropdown box will allow you to select any of the Standard Ports in the list. These are the same ports which can be accessed from the MyPorts sheet and refer to the Ports as taken from Reeds Almanac which are the main ports referenced in the UK and Europe Tidal Atlas(s). If you are requiring to use a Port not on this list you can go to MyPorts and go through the process of selecting your own Port as described above in the section: “Enter and Save Your Own Port” and/or “Select Your own Port (Editable)”.
Item C - Yellow Text box with description to the left “Tidal Area:”. You can enter your own description here relating to your EVENT 1 requirement e.g “Entry to Strangford narrows”, “Westward direction of Start Point stream” “Easterly Stream” etc. etc.
Item D - Yellow Date Box with description to the left “Date: dd/mm/yyyy. Enter the start date of EVENT 1. Note that the two boxes below cannot be edited and will adjust automatically to your date and High Water entries.
Item E - G - Yellow Time Boxes (3 No.) with descriptions to the left “HW(1) Time HH:MM, HW(2) Time HH:MM, HW(3) Time HH:MM. This is where you enter the High Water times on the first day for the selected Tidal Reference/Standard Port. This data will be obtained from the many sources of Tide High Water data to be found either in your current Reeds Almanac pages or through online sources showing tidal data for Ports, harbours and other areas. Note that the third entry maybe for the following day, and the automatic date calculation will reflect this.
Item H - Yellow dropdown box with description to the left reflecting the Date of first HW entry. Clicking this dropdown box will allow you to select the Spring/Neap tide state for the date of your first High Water entry. It is for reference/information purposes only and has no effect on any subsequent calculations. The source of the data will be generally obtained from where you sourced your High Water tidal data.
Item I - L - Four boxes to the right and below the Spring/Neap tide box. These boxes are non editable and will reflect data which you will subsequently enter in the “DATA ENTRY FOR EVENT 1:” area below.
Item M - Action Button entitled “Jump To Tidal Stream Start/End Time Entry”. Clicking on this button will quickly send you to the “DATA ENTRY FOR EVENT 1:” described below.
Item O - Action Button entitled “CLICK TO RESET EVENT 1 DATA”. Clicking this button will cancel all the user entered data for EVENT 1, the objective being to start from scratch again. Clicking the button will initially give you a warning as follows: "Should we delete all data from EVENT 1. This will delete all tide times and all other data selected and/or input by you, the Result panel will be blanked out and the date will revert to today's date?”.
You will then have the option of clicking an “OK” or “Cancel” button either to carry on with deletion or not to carry on.
Item N - Details in black (5 lines) below the “RESULT” caption. This area returns the results of your data entries and gives the Start and end times of the first occasion (Event (1)) and the Start and end times of the second occasion (Event(2)). The Duration time of each event occurrence is also shown in hour:minute format.
Figure 2. The following is a description of the area below the above details:
Item P - DATA ENTRY FOR EVENT 1:
This is the area where you will enter the “STREAM START TIMES” and “STREAM END TIMES” for EVENT 1.
This is the part entitled “EVENT Start/End Times Related to Tidal Reference Port” and below the heading is the caption “DATA ENTRY FOR EVENT 1:”
Item Q - STREAM START TIMES entry. this is where you will enter the Ebb Stream or Flood Stream Start times data which you will have derived from the relevant Tidal Atlas for the area in question or by reference to relevant Pilot books advice or data from online advice from web sites regarding the area in question.
Clicking on any of the HH:MM (green or red entry boxes) will set it to 00:00. Your entry in HH:MM format will reflect the start of the ebb or flood stream time either ahead (+) of the High Tide at the Tidal Reference/Standard Port of behind (-) the High Tide.
Note: Following your entry, click on either of the “Enter” captions to the right prior to making further entry. Otherwise if you click on the box below this would “Zero” both boxes, requiring you to make the entry again.
Try playing with the boxes to get an idea of how they work and how they stop you from inputting data into the wrong boxes. Note that you are not allowed to enter data in both of the same green or red sets of boxes.
Item R - STREAM END TIMES entry. this is where you will enter the Ebb Stream or Flood Stream End times data which you will have derived from the relevant Tidal Atlas for the area in question or by reference to relevant Pilot books advice or data from online advice from web sites regarding the area in question.
Clicking on any of the HH:MM (green or red entry boxes) will set it to 00:00. Your entry in HH:MM format will reflect the End of the ebb or flood stream time either ahead (+) of the High Tide at the Tidal Reference/Standard Port of behind (-) the High Tide.
Note: Following your entry, click on either of the “Enter” captions to the right prior to making further entry. Otherwise if you click on the box below this would “Zero” both boxes, requiring you to make the entry again.
Item S - To the right of the caption is a command button “Calculate EVENT 1 TIDES”. This is the button which, when clicked after you have completed your data entry, will check whether you have entered the required and relevant Data in the requested boxes as described above. It will then check to see if you have entered relevant Stream Start and End Times and will then proceed to fill the results table above with the calculated two Events start and end times. It will then check the calculated duration times and ascertain whether they are within a sensible range. (More detail of this is described later).
It is MOST IMPORTANT that this command button is clicked otherwise, although a result will be generated, it will not have been checked for validity.
Try playing with the boxes to get an idea of how they work and how they help to stop you from inputting data into the wrong boxes. Note that you are not allowed to enter data in both of the same green or red sets of boxes, as clicking on either of the boxes will initialise both boxes to 00:00.
Note the 2 Command buttons to the left of the Stream Start and End Times main entry panel:
Item T - Command Button “Clear Data Entry 1”. Clicking this button will clear all of the data in the Stream Start and Stream End Times entry boxes to the right. Why would you want to do this? If you changed the Event Description from “Ebb Tide” to “Flood Tide” or from “Flood Tide to Ebb Tide” you will need to change the input of the Stream Start and Stream End Times entry boxes, so clicking the button instantly “Zero’s” the boxes for you.
Item U - Command Button “Copy Stream Data From 1 - 2”. Clicking this button will copy the Stream Start and End Data from EVENT 1 to EVENT 2. Clicking the button will initially give you a warning as follows: "Should we COPY the EVENT Start/EndTimes Related to Tidal Reference Port DATA ENTRY from EVENTS 1-2? This will copy the following: Stream Start Times for Ebb and Flood Tides, Stream End Times for Ebb and Flood Tides from EVENTS 1-2. IS THIS OK?”.
You will then have the option of clicking an “OK” or “Cancel” button either to carry on with the Copy, or not to carry on.
The point of this action is if you are using the same general data in EVENT 2 as in EVENT 1, including the same Ebb or Flood event but for different dates., in which case you would need to edit the tidal dates and High Water data.
We now come to the “CONSOLE” area placed vertically in the centre of the TScalculator page. Except for the top button (W1), the purpose of all the other Command Buttons is to make it quick and easy to perform various functions relating to Data copying from one Event to another Event and/or to Reset all of the TScalculator data in order to completely return to a “blank/clean” start sheet.
The description and purpose of each button is as follows:
Item W1 - Command Button “Choose Port from My Port List”. Clicking this button will take you directly to the console of the MyPorts sheet so that you can carry out Your own Port editing as described in the above “Detailed function of MyPorts sheet - Figure 3.”
Item W2 - Command Button “Jump To Event 3 & 4”. Clicking this button will simply quickly jump you to the lower Events, namely EVENT 3 and EVENT 4.
Item W3 - Command Button “Copy Data From Event 1 to Event 2”. Clicking on this button will copy all of the input Data from EVENT 1 to EVENT 2. Clicking the button will initially give you a warning as follows:
"Should we COPY all data from EVENTS 1-2?"
"This will copy the following:”
"Tidal Area event (Ebb or Flood Tide)”
"Tidal Reference/Standard Port data and your entry for the Tidal Area”
"Tide times data”
"Spring/Neap data"
"Tidal Stream Data"
"from EVENTS 1-2"
"NOTE: You may need to re-choose the EVENT 2 Ebb Tide/Flood Tide selection”
"IS THIS OK?”
You will then have the option of clicking an “OK” or “Cancel” button either to carry on with the Copy, or not to carry on.
This would be useful, for instance, if you wished to calculate the Ebb Tide Start/End time events and the Flood Tide Start/End events for the same area. If this was so, then you may need to re-choose the EVENT 2 Ebb Tide/Flood Tide selection. Alternatively you could be wanting to calculate the same data but for a different day, requiring the entry of HW times for that day.
Item W4 - Command Button “Copy Data From Event 2 to Event 3”. Clicking on this will carry out the same function as Item W3, using Data from EVENT 2 and copying it to EVENT 3.
Item W5 - Command Button “Copy Data From Event 3 to Event 4”. Clicking on this will carry out the same function as Item W3 and W4, but using Data from EVENT 3 and copying it to EVENT 4.
Item W6 - Command Button “Copy Tide Times Only From Event 1 to All Events. Clicking on this is a very quick way to transfer the relevant HW times from EVENT 1 to the other 3 EVENTS. This would be used as a basis for calculations on the same day, using the same TidalReference/Standard Port, and is a quick way to use the same tidal data in all EVENT calculations.
Clicking the button will initially give you a warning as follows:
"Should we COPY all TIDE DATA only from EVENTS 1-4?”
"This will copy the HW Times Data ONLY for the dates selected in EVENT 1”
"All other data in EVENTS 2-4 will be unaffected”
You will then have the option of clicking an “OK” or “Cancel” button either to carry on with the Copy, or not to carry on.
Item W7 - Command Button “RESET ALL DATA FROM EVENTS 1 - 4. Clicking non this will reset all the user input to the original “Factory setting”. i’e “back to Square One” and you will now have a clean sheet with which to work.
Clicking the button will initially give you a warning as follows:
“Should we Reset ALL data from EVENTS 1-4?”
This will delete all tide times and all other data selected and/or input by you, and the dates will revert to today's date?”
“All Data will be reset to original"
"ARE YOU SURE?"
You will then have the option of clicking an “OK” or “Cancel” button either to carry on with the Reset, or not to carry on.
How to use the Tide & Tidal Stream Calculation Form
Please note that the Application has many checks and balances built into it to help make it easy for the user to put the correct information into the correct input boxes in the correct format.
The objective of this form is to help to calculate the tidal stream start and end times for particular parts of the coast along the Passage Plan Route such as headlands and other areas along the route where we wish to take advantage of favourable streams. This is of particular interest to sailing yachts where knowledge of streams throughout the passage can make the difference between a pleasant voyage or an uncomfortable one, particularly when the passage time exceeds more than one tidal period.
The example shown is for the tidal stream in the area of Start Point on the South West Coast of England. We want to calculate the South Westerly stream start/end times for the date of Friday 19th. March 2024.
An inspection of the Tidal Atlas for the relevant area we see that the tidal reference port for the area is Dover (English Channel West (NP250)).
We enter the Direction of Stream, Tidal Reference Port, Tidal reference Area and Date into the yellow boxes, A, B, C, D, as shown on the above table.
Thus; We select “Flood Stream” for box Item A, “Dover” in box Item B and “Start Point - South Westerly Stream in box Item C.
The tide times for Dover on that day tells us that the high tides are at 00:48, 12:59 and the next high tide is at 01:15 the following day, 20th. March. We enter these times in the top three time boxes on the table, Item E, Item F and Item G.
Noting that the state of the tides is “Springs + 2 days” we select this for box Item H (Note that this has no effect on the calculations and is for reference only).
We now need to find out the start and end times of the tidal stream in the area specified (Start Point). Inspecting the pages of the Tidal Atlas for the South West/Channel area of England, and looking at the direction of the tidal stream arrows in the Start Point area, we can see that the South Westerly stream starts at High Water Dover - 01:20 hours, and that it ends at HW Dover
+ 04:45 hours. (Note that there are other ways of finding this information as discussed above).
Thus, we select the “DATA ENTRY FOR EVENT 1:boxes and enter 01:20 into ‘Flood stream -’ box within the “Stream Start Times Item Q”. The Tidal Stream End time of 04:45 is entered into ‘Flood stream +‘ box within the “Stream End Times Item R”. Note that the time is entered as 01:20 as this box represents 'minus' 01:20 hours. Do not insert “- 01:20” as this will be rejected and a warning will appear saying “the formula you typed contains an error”!
When the Stream Start and End times have been entered correctly, Click on the Item S, “Command Button Calculate EVENT1 Tides”. This will check that you have input data in relation to the chosen “Flood tides”, together with other relevant user entries and will then check to see if a sensible result has been returned for the Stream Start and End times.
Thus, the following Event times are calculated as follows (see Figure 4 and Figure 5):
The Stream Start and End result times are detailed in the area covered within Item N:
RESULT
Stream (1) Starts on Thursday 28/03/2024 at 23:28
Stream (1) Ends on Friday 29/03/2024 at 05:33
Duration (1) is 06:05
Stream (2) Starts on Friday 29/03/2024 at 11:39
Stream (2) Ends on Friday 29/03/2024 at 17:44
Duration (2) is 06:05
It is usually quite clear that the direction of movement into and out of a river, harbour, inlet, lagoon, estuary and suchlike where the tide is either rising (Flood) or falling (Ebb). However out to sea it is not so obvious and this sometimes makes it difficult to decide which is which for the particular Event for which we want to know the Start and End times of the tidal movements. Do we calculate for an Ebb tide movement or a Flood tide movement? (See APPENDIX 1 - Ebb and Flood Tide description). We calculated for an Ebb stream in the above example, If we had calculated on the assumption of a Flood stream, the result calculated would have not made sense as described elsewhere in these instructions and below.
If we cannot be sure, the answer generally is that calculating for the incorrect tide (i.e. making the calculation for an assumed Ebb tide when it should be for a Flood tide or vice versa) will return a nonsensical result.
If this is the case, when you click on “Command Button Calculate EVENT 1 Tides” a warning message will appear as follows:
“Possible Problem here!!”
" The Tidal durations are shown as being in excess of 6 hours which is unlikely. Have a look at the Start and End dates of Tide Event(1) and Tide Event(2). Is the end date prior to the start date? This clearly would not be right!”
"Please check your inputs i.e HW times and Stream Start and End times. However if these are correct the most likely culprit is the Flood Tide/EbbTide selection, particularly if you are using third party data for Stream Start and End times."
" Please see instruction for greater details, however interposing 'Flood Tide' and 'Ebb Tide' and placing the Stream times in the correct boxes may solve the problem”
Thus, it is likely that the incorrect entry has been entered for the Event Description Item N.
Re-calculating the Event by changing the Ebb tide entry to a Flood tide entry and by placing the start/end hours in the relevant Stream Start and Stream End times, should give the correct (and sensible) result. Needless to say, please ensure that you have entered the correct High Water Details and the Stream Start/End times for the required Tidal area.
As detailed elsewhere in these instructions, when you click on the “Calculate Event Tides Command Button”, (Item S on Figure 2.) the application will calculate and check to see that a sensible result has been returned, otherwise a warning message will be returned to advise that the result calculated is not what would be expected.
It does look a bit complicated to begin with but really is quick and easy once you get the hang of it. The start and end times of the streams in question are always the same in relation to the HW times at the relevant Tidal Reference Port.
During our research for the TScalculator we came across a website which showed lots of examples of start and end times for Ebb and Flood events for routes in many sailing areas of the UK. It also helped us to prove that the Ebb/Flood choices were not always as expected, particularly when the Tidal Event we were wishing to calculate was not obvious i.e was off-shore rather than a more obvious Ebb or Flood event into an Estuary/Narrows or Entry/Exit near a Port. The site we looked at is www.eOceanic.com and you may find it useful to check out for some practice. Please note that if you visit that site you will leave our passageplanning-sales.com terms and conditions of use.
Sorry, but we now have to include the following disclaimer:
Disclaimer: Not for Navigation. Please be aware that the use of this application/form is entirely at the user’s own risk and the application/form author, www.passageplanning-sales.com and/or its owners and/or its employees cannot be held liable for the results and/or consequences or subsequent or consequential loss or damage caused by the use or misuse of any of the data contained in this application/form or data generated by this application/form or data subsequently used in this application/form by you, the user or any other user of this application/form. In addition by downloading and using the TScalculate application you agree to the Terms and Conditions of sale and Privacy Policy of www.PassagePlanning-sales.com which may be viewed at www.passageplanning-sales.com/online_sales_terms_and_conditions.html and www.passageplanning-sales.com/privacy_policy.html. Both of these policies are occasionally updated by us so we suggest you revisit it from time to time and so continually check these pages as continued usage of this site and any and all of the downloads offered by passageplanning-sales.com and downloaded by you will mean that you equally accept these later postings. You agree that you have thoroughly read and understood the above instructions and discussion in Appendix 1 and Disclaimer prior to your use of the downloaded TScalculate application. Do not use the TScalculate unless you agree to this disclaimer.
APPENDIX 1
Ebb and Flood Tides - A definition and discussion
A Definition of ebb and flood tides:
The following two definitions of ebb and flood can be found in general literature.
1. Ebb is the tidal phase during which the tidal current is flowing seaward (ebb current) and flood is the tidal phase during which the tidal current is flowing inland (flood current);
2. Ebb is the tidal phase during which the water level is falling and flood the tidal phase during which the water level is rising.
The two definitions do not coincide. The first definition is more usual for tidal inlet systems: estuaries, tidal lagoons and tidal rivers; the second definition is more usual for the open coast.
This is the common definition for ebb and flood tides, other definitions are discussed in the following article.
Coastal current flow:
In coastal oceanography, the terms ebb and flood refer to tidal currents. These terms are particularly relevant for tidal inlet systems: estuaries, tidal rivers and lagoons. The ebb current corresponds to seaward flow and the flood current to landward flow. The ebb current does not fully coincide with the falling tide i.e. the period of decreasing water level. The ebb current reverses some time after low water; the water level at sea starts rising already before the inlet system is emptied. Likewise, the flood current reverses some time after high water.
On the open sea the terms ebb and flood are not well defined. The tidal current vector rotates during the tidal cycle; the tidal current is never zero. On the contrary, high water (HW) and low water (LW) are well defined. At the beach, the period from LW to HW (rising tide, corresponding to a landward advancing waterline) is called flood. The period from HW to LW (falling tide, corresponding to retreat of the waterline) is called ebb. However, close to the shoreline, the tidal current is almost unidirectional along the coast. In the period around HW, the tidal current flows with the coast to the right in the Northern Hemisphere and with the coast to the left in the Southern Hemisphere; this is called the flood direction. The opposite holds for the tidal current in ebb direction in the period around LW.
The above definition and discussion offers, in our opinion, an excellent means to understanding Ebb and Flood in regard to the Event Description as required to be chosen for each Event in the TScalculator main sheet.
It is usually quite clear that the direction of movement into and out of a river, harbour, inlet, lagoon, estuary and suchlike where the tide is either rising (Flood) or falling (Ebb). However out to sea it is not so obvious and this sometimes makes it difficult to decide which is which for the particular Event for which we want to know the Start and End times of the tidal movements. Do we calculate for an Ebb tide movement or a Flood tide movement?
If we cannot be sure, the answer generally is that calculating for the incorrect tide (i.e. making the calculation for an assumed Ebb tide when it should be for a Flood tide or vice versa) will return a nonsensical result. Re-calculating for the Event by changing the Ebb tide entry to a Flood tide entry and by placing the start/end hours in the relevant Stream Start and Stream End times, should give the correct (and sensible) result. Needles to say, please ensure that you have entered the correct High Water Details and the Stream Start/End times for the required Tidal area.
As detailed elsewhere in these instructions, when you click on the “Calculate Event Tides Command Button”, (Item S on Figure 2.) the application will calculate and check to see that a sensible result has been returned, otherwise a warning message will be returned to advise that the result calculated is not what would be expected.
Reference: Parts of the above definitions and discussion is copied with the kind permission from an article written in Coastal Wiki. The Coastal Wiki is hosted and developed by the Flanders Marine Institute (VLIZ) - contact: info@coastalwiki.org
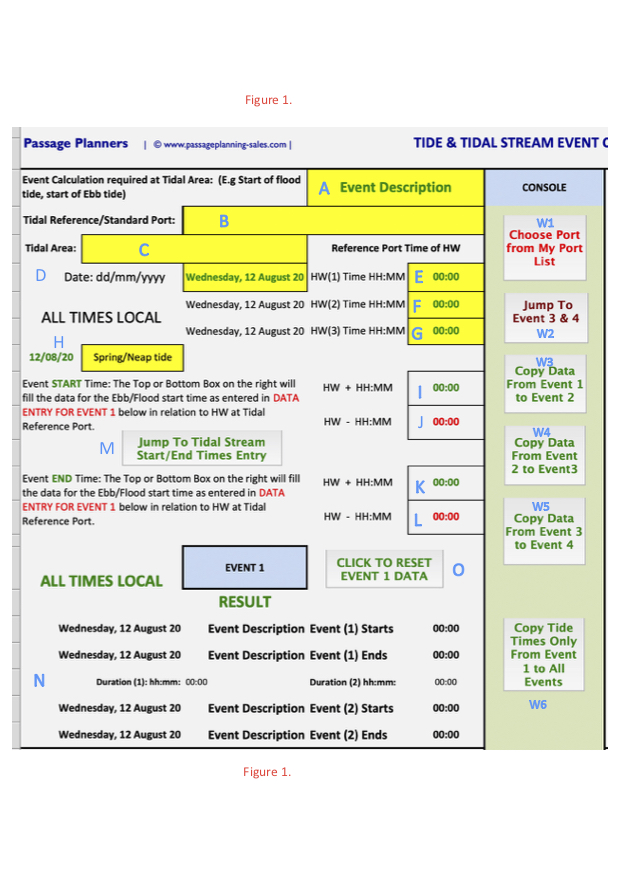
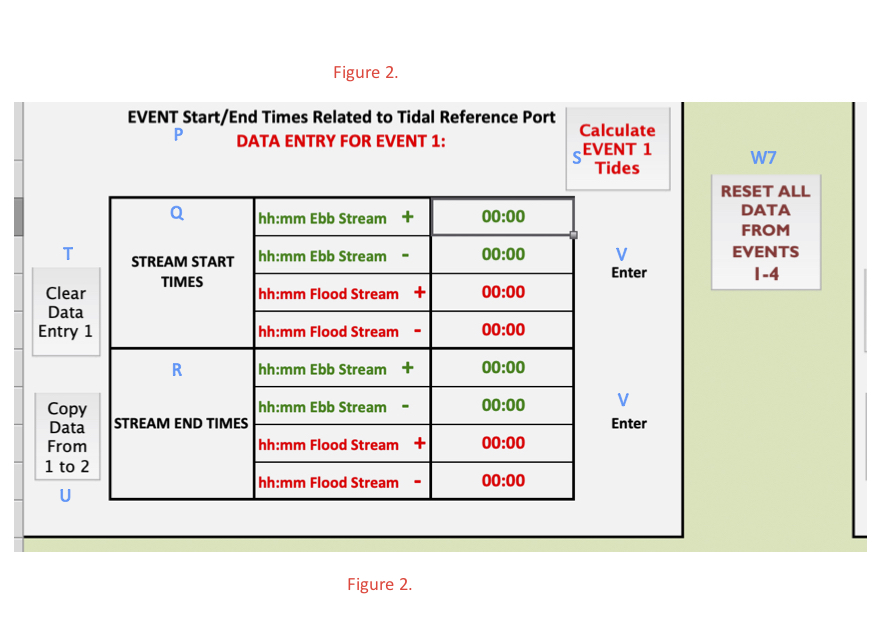
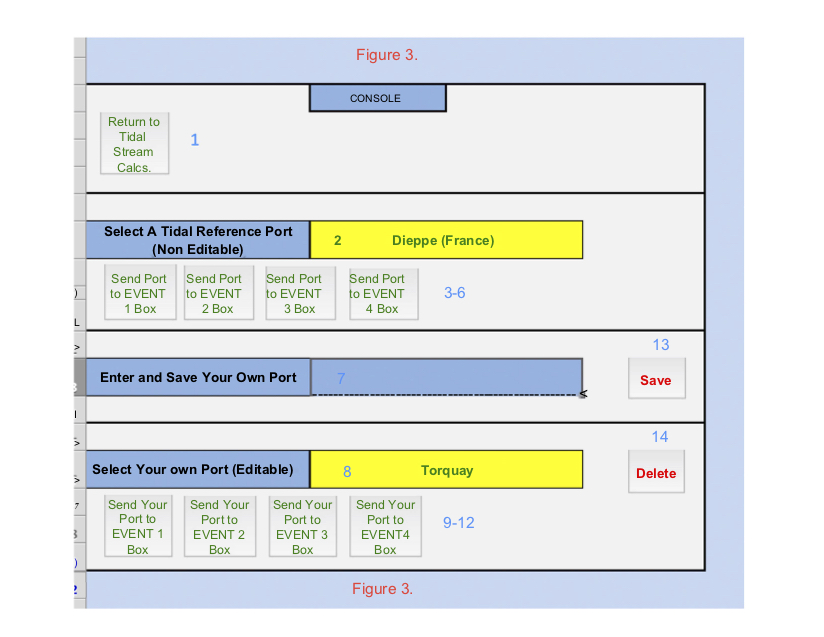

Figure 4
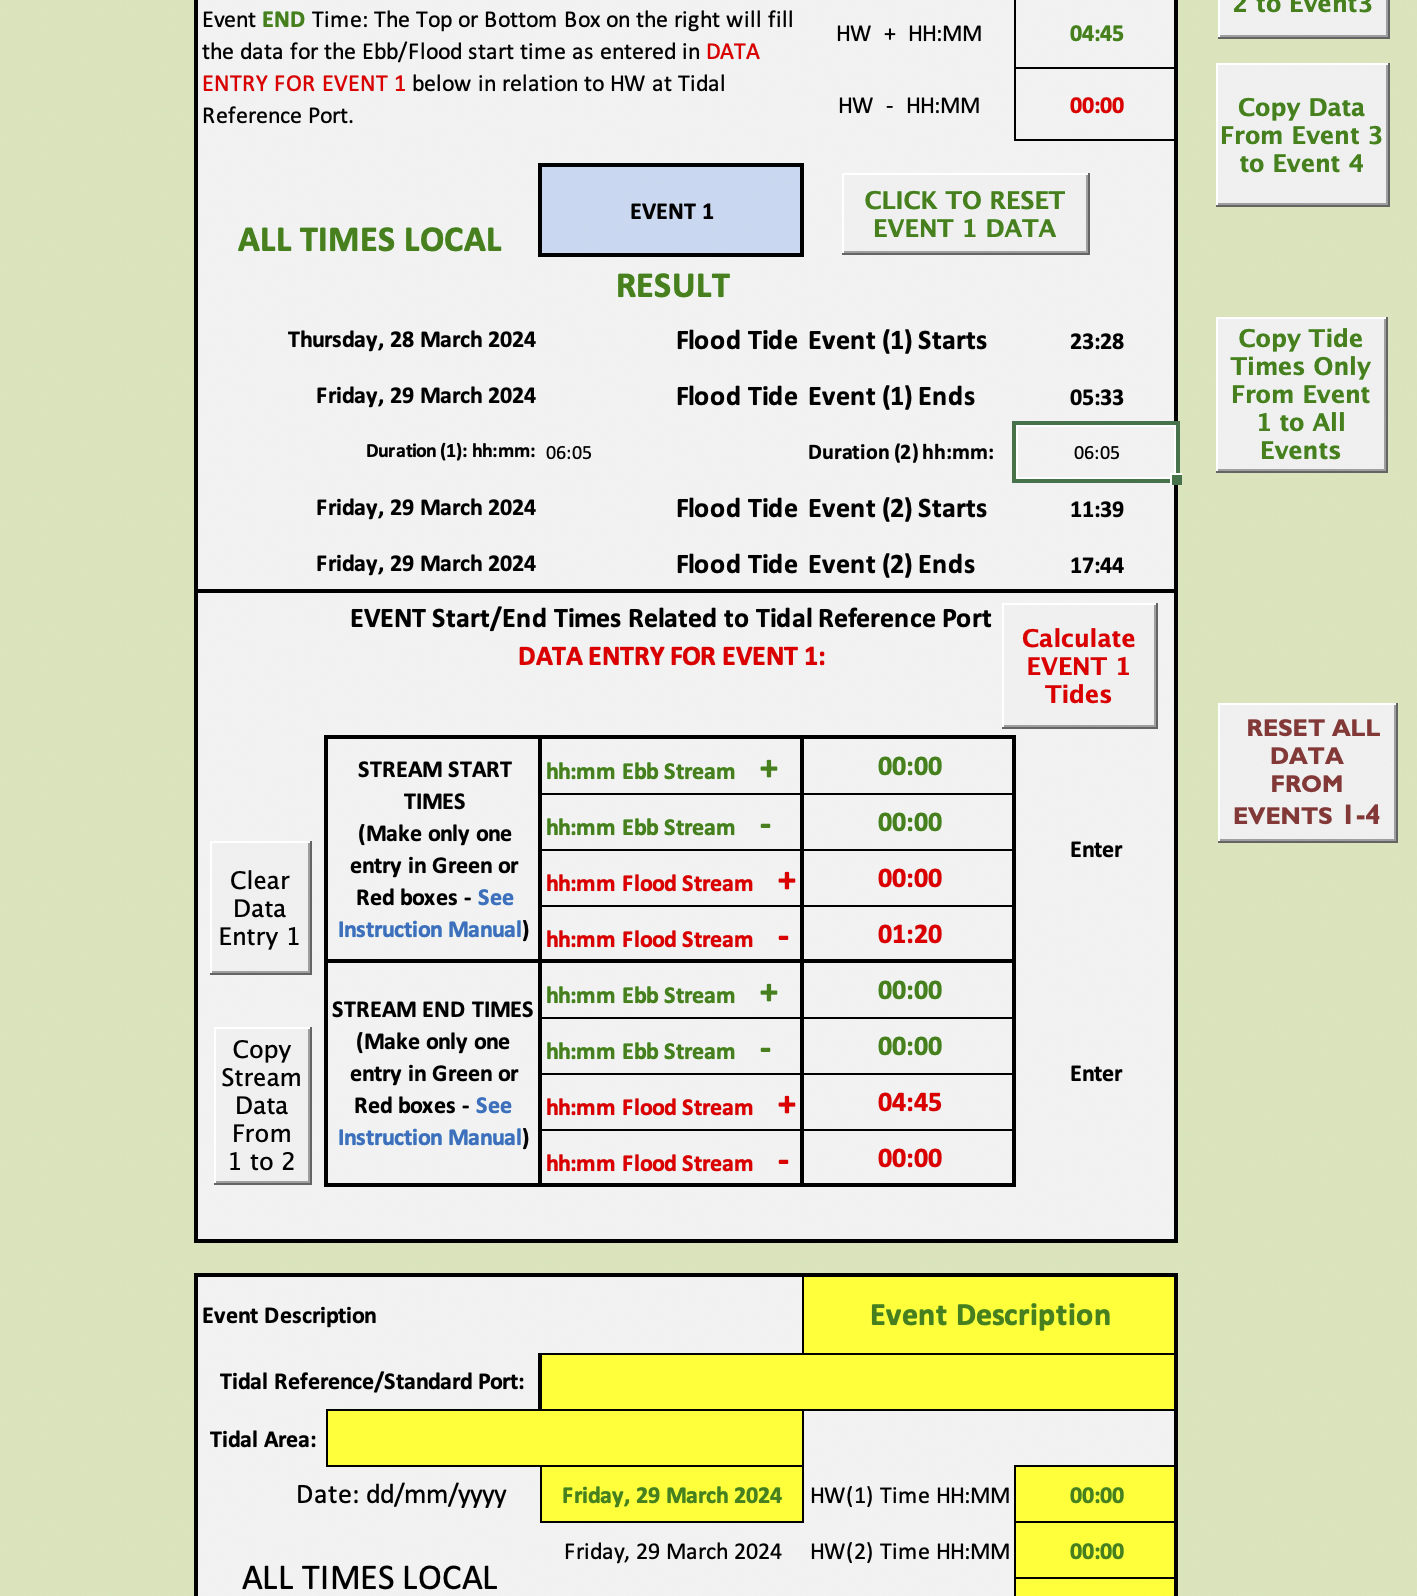
Figure 5

Figure 6

Figure 7
Figures 6 and 7 show the results when the Start Point Stream is in the East north east direction.
(Set the direction as 'Ebb Tide')
East-northeast going stream
(HW Dover +0445 to -0120)
RESULT Of Start Point East North East Stream:
Stream (1) Starts on Thursday 29/03/2024 at 05:33
Stream (1) Ends on Friday 29/03/2024 at 11:39
Duration (1) is 06:11
Stream (2) Starts on Friday 29/03/2024 at 17:44
Stream (2) Ends on Friday 29/03/2024 at 23:55
Duration (2) is 06:11
Copyright © 2024 passageplanning-sales.com